
Welcome, Guest!
Here are some links you may find helpful
Dreamcast [DEV] Dreamcast BBA Converter !
- Thread starter Xrider
- Start date
You are using an out of date browser. It may not display this or other websites correctly.
You should upgrade or use an alternative browser.
You should upgrade or use an alternative browser.
This is an amazing discovery Xrider and props for getting it working!
I think it could be pretty interesting to also route the RJ45 connector to the DC expansion PCB, this could allow it to look stock with the Sammy board as a sort of side-car. Or perhaps the Sammy board could be internalized.
That said, I'm not very familiar with Sammy at all, I hope we're not destroying a piece of history by consuming all these Sammy LAN cards for our DCs. At least this mod doesn't require cannibalizing it though, knowing it's reversible is nice.
I think it could be pretty interesting to also route the RJ45 connector to the DC expansion PCB, this could allow it to look stock with the Sammy board as a sort of side-car. Or perhaps the Sammy board could be internalized.
Thanks for sharing the link cyrix, I've been keeping an eye out on eBay but hadn't found this.More communication cartridges for sale again on Ebay for $20 shipped:

Sega Universal Control Panel Button Arcade Cabinet Part | eBay
Find many great new & used options and get the best deals for Sega Universal Control Panel Button Arcade Cabinet Part at the best online prices at eBay! Free shipping for many products!www.ebay.com
That said, I'm not very familiar with Sammy at all, I hope we're not destroying a piece of history by consuming all these Sammy LAN cards for our DCs. At least this mod doesn't require cannibalizing it though, knowing it's reversible is nice.
- Nov 25, 2019
- 54
- 18
- 8
- AGName
- supersega
- AG Join Date
- Jul 25, 2014
This is an amazing discovery Xrider and props for getting it working!
I think it could be pretty interesting to also route the RJ45 connector to the DC expansion PCB, this could allow it to look stock with the Sammy board as a sort of side-car. Or perhaps the Sammy board could be internalized.
Thanks for sharing the link cyrix, I've been keeping an eye out on eBay but hadn't found this.
That said, I'm not very familiar with Sammy at all, I hope we're not destroying a piece of history by consuming all these Sammy LAN cards for our DCs. At least this mod doesn't require cannibalizing it though, knowing it's reversible is nice.
I also had that feeling about this, but I'll be keeping my Atomiswave casing and screws safe, just in case. Just bought one!! By the way @Xrider , I'd love to take a crack at making an all-in-one 3D printed case for the Atomiswave card and your PCB.
Last edited:
- Apr 19, 2020
- 65
- 71
- 18
- AGName
- Xrider
- AG Join Date
- 19/05/2020
That said, I'm not very familiar with Sammy at all, I hope we're not destroying a piece of history by consuming all these Sammy LAN cards for our DCs.
Important information that I have not specified.
The SAMMY communicator remains perfectly functional in an Atomiswaves, all you have to do is unplug the ribbon cable and re-plug the communicator ;-D
You right !At least this mod doesn't require cannibalizing it though, knowing it's reversible is nice.
Cross-posting myself from Dreamcast-Talk:
 .
.
I'll do some iterations of it when I receive my Sammy LAN PCBI made a quick draft of what a 3D printed case for this could look like. All I had to go on was measurements of my DC and pictures of the Sammy PCB though so not quite accurate. The Sammy PCB would be mounted at an angle and the RJ45 port sticking out at the top. Feasibility TBD.
An alternative approach is to use the original casing for the modem and route the ribbon cable through the gaps. Best option might be to route it to the back (needs a slightly longer cable) and build a separate case for the Sammy. Alternatively the Sammy could be placed under the Dreamcast by raising it (some kind of casing, risers, etc).
Anybody got any other ideas?
 .
.Nice design !Anybody got any other ideas?
The solution under the Dreamcast would be incompatible with karaoke-like options, so I wouldn't go for that
")
Not sure I would go for the "at an angle" option personally... a slightly bigger modem case (ie, expanding horizontally, not vertically/diagonally) would be good for me, especially since the ethernet port is already at the top...
Another option, probably even better for me, would be to have the ethernet port point to the back of the dreamcast, so having the atomiswave bba board point upwards
True, I'm not really a fan of this method either.The solution under the Dreamcast would be incompatible with karaoke-like options, so I wouldn't go for that
This would be my alternative approach if the at-angle doesn't work out. To be honest they're not too different from each other. At angle should allow the case to be a bit shorter and the bottom footprint similar to original.Not sure I would go for the "at an angle" option personally... a slightly bigger modem case (ie, expanding horizontally, not vertically/diagonally) would be good for me, especially since the ethernet port is already at the top...
I did consider it as well, but it would increase the height of the dreamcast substantially. Instead, ideally, if we managed to relocate the RJ45 port onto the extension PCB, then we wouldn't need to make the original RJ45 port accessible.Another option, probably even better for me, would be to have the ethernet port point to the back of the dreamcast, so having the atomiswave bba board point upwards
This is btw what I had in mind for the behind-Dreamcast solution:

The back case only holds the Sammy, the original Dreamcast modem case would be used to house the extension PCB. The back case attaches to the Dreamcast modem case via the RJ45 port hole. The attachment is locked from the inside of the modem case so that they are essentially one unit. The ribbon cable would travel between the modem case and Dreamcast by the gap in the back and into the Sammy case (as I've attempted to picture).
The "feet" are to add stability when stationary, provide access to air-vents and DCDigital.
- May 31, 2019
- 344
- 337
- 63
- AGName
- -=FamilyGuy=-
- AG Join Date
- March 3, 2007
I dig that design. Once the DIY kits are available I'd like to print/order these.True, I'm not really a fan of this method either.
This would be my alternative approach if the at-angle doesn't work out. To be honest they're not too different from each other. At angle should allow the case to be a bit shorter and the bottom footprint similar to original.
I did consider it as well, but it would increase the height of the dreamcast substantially. Instead, ideally, if we managed to relocate the RJ45 port onto the extension PCB, then we wouldn't need to make the original RJ45 port accessible.
This is btw what I had in mind for the behind-Dreamcast solution:
View attachment 9275
The back case only holds the Sammy, the original Dreamcast modem case would be used to house the extension PCB. The back case attaches to the Dreamcast modem case via the RJ45 port hole. The attachment is locked from the inside of the modem case so that they are essentially one unit. The ribbon cable would travel between the modem case and Dreamcast by the gap in the back and into the Sammy case (as I've attempted to picture).
The "feet" are to add stability when stationary, provide access to air-vents and DCDigital.
back -> Cool solution indeed.
You would need to leave some space at the back for the DC lid to open however - 5mm - 1/5th of an inch ?
Passing the ribbon cable through the hole would also not be that straightforward I suppose...
You would need to leave some space at the back for the DC lid to open however - 5mm - 1/5th of an inch ?
Passing the ribbon cable through the hole would also not be that straightforward I suppose...
I'm pro open-source, I would be releasing the design files once they're ready, for sure.I dig that design. Once the DIY kits are available I'd like to print/order these.
Good observation, depending on it's height it may indeed be needed, seems 4,5mm should be enough. I've thought about passing the ribbon cable through the RJ45 hole instead of through the gap between console and modem, but I'm not sure how feasible it will be. I'll definitely investigate because I think it would be a nice solution. Essentially a 15-pin 1mm pitch ribbon cable would fit quite well, so if we could bend the 30?-pin cable down along the middle it could just work. But how well will the connector side deal with bending? I don't know.back -> Cool solution indeed.
You would need to leave some space at the back for the DC lid to open however - 5mm - 1/5th of an inch ?
Passing the ribbon cable through the hole would also not be that straightforward I suppose...
- Nov 25, 2019
- 54
- 18
- 8
- AGName
- supersega
- AG Join Date
- Jul 25, 2014
Dangit! Everything I do, someone else has already done haha. Nice work!Cross-posting myself from Dreamcast-Talk:
I'll do some iterations of it when I receive my Sammy LAN PCB
- Apr 19, 2020
- 65
- 71
- 18
- AGName
- Xrider
- AG Join Date
- 19/05/2020
New assembly tutorial video is available :
The Dreamcast BBA converter available very soon
The Dreamcast BBA converter available very soon
New assembly tutorial video is available :
The Dreamcast BBA converter available very soon
Looks very straightforward, great kit and great install video.
Excited to be able to order one soon. Thanks for making this
New assembly tutorial video is available :
The Dreamcast BBA converter available very soon
Very nice! Super cool! Génial !
Looking forward to getting a few kits and throwing them together.
Now, if only there was a source for the G2 bus connectors without harvesting them from modems...
Now, if only there was a source for the G2 bus connectors without harvesting them from modems...
- Apr 19, 2020
- 65
- 71
- 18
- AGName
- Xrider
- AG Join Date
- 19/05/2020
Hello,
The kit BBA Converter DIY is now available on ebay :
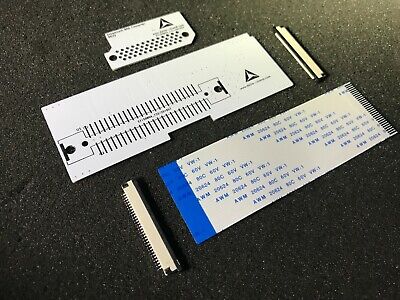
The kit BBA Converter DIY is now available on ebay :
Dreamcast bba converter kit diy for sega dreamcast console | eBay
Com, this kit allow to create the Dreamcast BBA with an Atomicwave Communicator. - Dreamcast BBA Converter Kit. - Dreamcast reconizes the Network adapter look like genuine Dreamcast BBA HIT-400. - Get the connector from your dreamcast modem.
www.ebay.com
- May 31, 2019
- 344
- 337
- 63
- AGName
- -=FamilyGuy=-
- AG Join Date
- March 3, 2007
Hello,
The kit BBA Converter DIY is now available on ebay :
Dreamcast bba converter kit diy for sega dreamcast console | eBay
Com, this kit allow to create the Dreamcast BBA with an Atomicwave Communicator. - Dreamcast BBA Converter Kit. - Dreamcast reconizes the Network adapter look like genuine Dreamcast BBA HIT-400. - Get the connector from your dreamcast modem.www.ebay.com
Any way to reduce the shipping to Canada? With it plus the import fees, that'll end up more than doubling the price...
-
This site uses cookies to help personalise content, tailor your experience and to keep you logged in if you register.
By continuing to use this site, you are consenting to our use of cookies.